| Version 1 (modified by , 7 years ago) ( diff ) |
|---|
Proxy Server
OML Documentation
The proxy-server is experimental and might change in the future, to be used with care
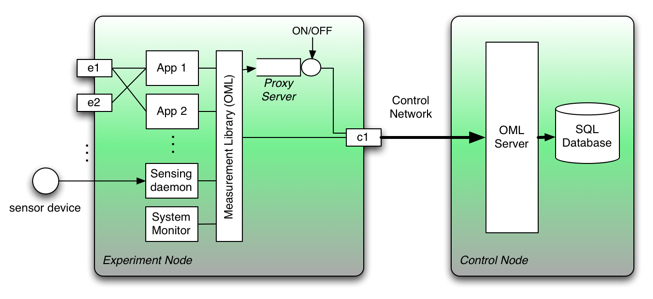
In several experiments, we cannot assume that there is a permanent channel between the client that makes the measurement and the server. Furthermore, in some other experiments this measurement channel could also be the experiment channel and therefore the experimenter would like to postpone the collection of measurement until the channel is available again.
In order to solve these two problems, OML provides a proxy-server that acts as a buffer that can be paused and resumed. This architecture was introduced in
- Jolyon White, Guillaum Jourjon, Thierry Rakotoarivelo, and Max Ott. "Measurement architectures for network experiments with disconnected mobile nodes," in TridentCom 2010, May 2010. Online.
It can be summarised by the following figure:
In this document, we present through an example how to use the proxy-server.
Study case scenario
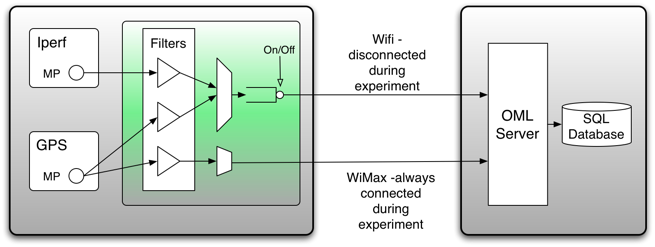
The goal of this experiment is to measure achievable throughput using UDP between a two nodes when one is moving around. During this experiment the mobile node will also record its location using a GPS. As a result this node will be configured as follows:
Presentation of the proxy-server
Before starting the proxy-server the experimenter has to install it on the node. The proxy-server is currently integrated inside the oml-server package but should have its own package soon.
Currently to install it, a user has to do:
sudo apt-get install oml-server
Once installed the user can now start it using the with the following options:
- -l, --listen=<port number>, the port to listen to receive measurements from the clients. By default, the proxy is listening on the port 3003.
- -d, --debug=INT, the debug level - error:1 .. debug:4
- --logfile=<file name>, the name for the log file. By default it is oml_proxy_server.log
- -v, --version, print the version information and exit
- -r, --resultfile=<file name>, the name of the temporary result file. By default it is oml_result_proxy.res<INT>, where INT is an increment number liked to a client.
- -s, --size=INT, the size for the memory buffer page for the measurements, by default 512.
- -p, --dstport=INT, the port of the OML server.
- -a, --dstaddress, the remote OML server address.
In addition, the proxy-server has two help options:
- -?, --help, which show an help message
- --usage, which display a brief usage message as follows:
Usage: oml2-proxy-server [-?v] [-?|--help] [--usage] [-l|--listen=3003] [-d|--debug-level=INT] [--logfile=oml_proxy_server.log] [-v|--version]
        [-r|--resultfile=oml_result_proxy.res] [-s|--size=INT] [-p|--dstport=INT] [-a|--dstaddress=address] configFile
In addition to the different configurations concerning the client and the server, the proxy server provides on the standard in interface basic interaction for the user. Indeed the proxy server is based on a three states machines. These three states are:
- Paused; in this state the proxy stores both in a file and in memory the measurements form the different clients connected to it.
- Resumed; in this state the proxy transfers the measurements to the server.
- Stopped; in this state the proxy finishes transferring the measurements to the serve and closed all its incoming and outdoing connections.
When you start the proxy, it is in the paused state. In order to change between the states three commands are available:
- OMLPROXY-PAUSE: change from Resumed to Paused
- OMLPROXY-RESUME: change from Paused to Resumed
- OMLPROXY-STOP: set to Stopped definitely
Configurations of the client and the server
The use of the proxy-server is transparent to the both the server and the client application. The only change when using the proxy server concerns the address of the server for the client MP stream.
Running the experiment
During the experiment the mobile node will follow the circuit shown on the next Figure, while the a static node acting as server for iperf will remain at the same place. We assume that in this experiment the oml2-server is also on static node and it is listening on the default port 3003. We also assume that the two are in ad-hoc mode and the IP addresses are 10.0.0.1 and 10.0.0.2 for the server and the client respectively.
At the beginning of the experiment, the experimenter starts iperf server on the static nodes using the following command and the oml configuration file server.xml:
iperf_oml2 -s -u --oml-config server.xml
Then on the mobile node the user has to start the proxy-server:
oml2-proxy-server -l 3003 --logfile=/var/log/oml_proxy_server.log -r /home/user/oml_result_proxy.res
Using this command, the proxy-server is started and listens on the port 3003. It will write the log file in /var/log/oml_proxy_server.log and the result files in /home/user/oml_result_proxy.res+<INT>. As explains before, the proxy server is in paused state but can still receive measurement.
If you would like to the proxy-server to send the measurement to an OML server listening at the address 10.0.0.2 and port 5000 (instead of to a local file as above), then you should use the command:
oml2-proxy-server -l 3003 --logfile=/var/log/oml_proxy_server.log -a 10.0.0.2 -p 5000
Finally, we need to start the iperf client using the following command and the oml configuration file client.xml:
iperf_oml2 -c 10.0.0.1 -u -b 150000 -t 300 --oml-config client.xml
Then, the experimenter can start walking following the circuit. Once the walk finished and in range of the oml2-server, the user give the command "OMLPROXY-RESUME" to the proxy-server, which in turn start the streaming of the measurement to the server.
Analysing the results
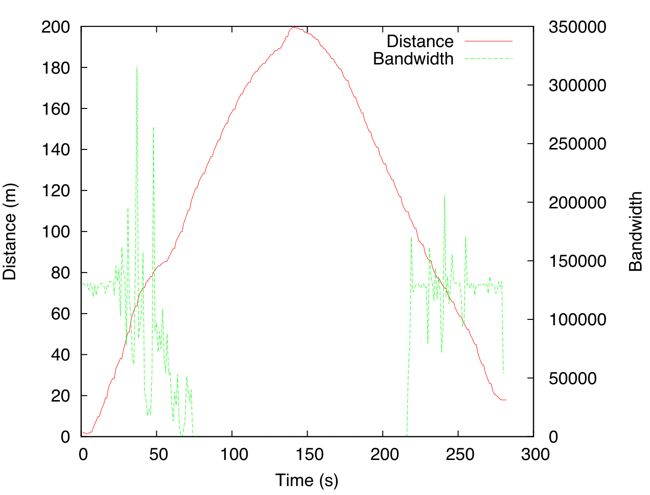
Following the description of the experiment we obtain the results displayed in the next figure.
Attachments (4)
-
ProxyServerArch.png
(85.5 KB
) - added by 7 years ago.
Proxy Server Architecture
-
ExperimentConfiguration.png
(41.1 KB
) - added by 7 years ago.
Iperf Experiment Configuration
-
circuit.png
(617.2 KB
) - added by 7 years ago.
Mobile Experiment Path
-
resultTridentcom.png
(66.1 KB
) - added by 7 years ago.
Experiment Results
Download all attachments as: .zip


