| Version 1 (modified by , 7 years ago) ( diff ) |
|---|
Configuring OML Client Applications
OML Documentation
Once an application has been modified to integrate OML measurements, two possible configurations are possible; either by passing general arguments in the command line of the enhanced application or by using a XML configuration file.
We recommend the use of the second kind of configuration, i.e., XML configuration file. Indeed, this is the only configuration that will allow the user to multiplex the measurement stream and applied different filters inside the application and between Measurement Points.
As an overview, the configuration of an OML application will allow to:
- configure the output of the measurement: file or/and address of OML server
- configure the two available by default filters
- disable measurements by OML
- configure the log information
Command line configuration
The first configuration possibility of OML is by using arguments on the command line when starting the application. The possible arguments are described in the OML Generic Interface.
Usage
The command line configuration should be used only for a debugging purpose as it is limited compare to the XML configuration file. Indeed, the following limitations have been identified.
You can only use either the --oml-samples or the --oml-interval configuration. These two configurations define the filter to be applied on the measurement points.
XML configuration file
We present in this section the configuration of OML using an XML file. This file allows the user to completely use all the capabilities of OML. It allows to multiplex the measurement streams contained in an application and it also allows to apply specific filters to every tuple defined in a Measurement Point.
In order to present these capabilities in a clear way, we will go through the configuration of OML for the OTR application, the receiver part of the OTG, traffic generator. This traffic generator, developed as one of the companion application of OML, generate UDP packet following different parameters such as the packet length or the generation pattern (exponential vs constant bit rate).
Presentation of OTR's Measurement Point
OTR defines one Measurement Point injected through OML for every received packet. This MP is constituted by the following fields:
- ts: OML_DOUBLE_VALUE, the time-stamp of the reception of the UDP packet;
- flow_id: OML_INT32_VALUE, the flow id as defined in the sender side;
- seq_no: OML_UINT32_VALUE, the sequence number as defined in the sender side;
- pkt_length: OML_UINT32_VALUE, the packet length;
- dst_host: OML_STRING_VALUE, the IP address of the destination;
- dst_port: OML_UINT32_VALUE, the destination port number.
Configuration of the application
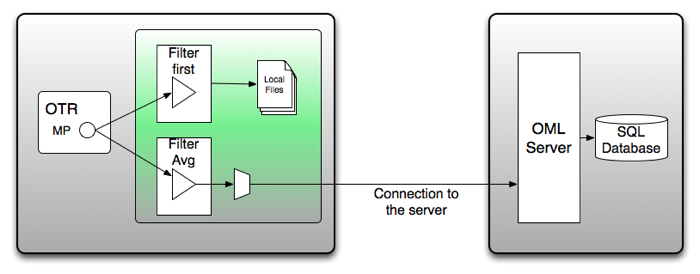
In this configuration we want to capture only the packet size from the previously introduced measurement point. Furthermore we want to apply two different filters to this measure and based on the filter we create two measurement streams targeting either a file or the OML server.
This configuration can be synthesised as follows:

This configuration can not be obtained through the command line configuration since we are configuring two writers (the file and the server) and two filters (average ad fist).
In order to realise this configuration, once needs to write the following XML code:
 1<omlc id='Receiver1' domain='npc_2010_04_19_13_24_48'>
 2  <collect url='tcp:10.0.0.200:3003'>
 3    <stream mp='udp_in' interval='2'>
 4      <filter operation='avg' field='pkt_length' rename='myFilterA'/>
 5    </stream>
 6  </collect>
 7  <collect url='file:/root/save.txt'>
 8    <stream name='udp_in' samples='1'>
 9      <filter operation='first' field='pkt_length' rename='myFilterB'/>
10    </stream>
11  </collect>
12</omlc>
- line 1: General information about the experiment. We define here the name of the experimental domain with the domain attribute. This will also be the name of the database on the server side.
- lines 2 to 6: We define here the bottom part of the previous figure. Indeed we define the measurement stream going the OML server. Furthermore, we define which Measurement Point we want to capture and the frequency of this measurement. Then, we define which field in particular we want to capture and its associated filter.
- line 2: We configure the writer we want to use. In this case we want to send the stream that will be defined in this tag to the OML server which is listening on the port 3003 with the IP address 10.0.0.200.
- line 3: We configure OML to only measure in this stream the MP called 'udp_in'. Furthermore, we want to collect this information with a frequency of 2 seconds
- line 4: We configure OML to only measure in this stream the field called 'pkt_length'. We want to apply the average filter to this measurement.
- lines 7 to 11: We define here the upper part of the previous figure. Indeed we define the measurement stream going the a local file. Furthermore, we define here which Measurement Point we want to capture and the frequency of this measurement. Then, we define which field in particular we want to capture and its associated filter.
- line 7: We configure the writer we want to use. In this case we want to send the measurement that will be defined in this tag to the local file '/root/save.txt'.
- line 8: We configure OML to only measure in this stream the MP called 'udp_in'. Furthermore, we want to collect this information with a frequency of 1 injection (i.e. we inject and save all the measurement captured).
- line 9: We configure OML to only measure in this stream the field called 'pkt_length'. We want to apply the first filter to this measurement.
Finally to use the previous script, a user needs to save in a file and start the application with the command line argument --oml-config <name of the XML file>
XML Elements and Attributes
See liboml2.conf for an exhaustive documentation.
| Element/Attribute Name | Description | Accepted Values |
| omlc | Start of the configuration for the OML instance | n/a |
| id | the ID for the oml instance | any string |
| domain | the ID of the experiment | any string |
| collect | Definition of streams to be sent to a given collection point | n/a |
| url | collection point for the associated measurement stream | tcp:<IP address of the server>:<port number of the server> or file:/dir/file |
| stream | Create a new stream | n/a |
| mp | Name of the Measurement Point to use as the data source for the stream | Measurement Point names |
| interval | frequency of the measurement in seconds | INT |
| samples | frequency of the measurement in size of the sampling | INT |
| filter | Definition of the filter to apply to a given field | n/a |
| field | Name of the field to filter | an existing tuple in the MP |
| operation | Name of the filter | an existing OML filter |
| rename | Name of the output field containing the filtered data | any string (will be suffixed with the name of the filter until bug is fixed) |
Attachments (1)
-
XML.png
(92.4 KB
) - added by 7 years ago.
OML Configuration
Download all attachments as: .zip